How To Epoxy Floors Fast & Save Money | Stone Coat Epoxy Subscribe now & learn all of our new techniques! Insiders Group: Join the Stone Coat Countertop Insiders Group for the latest tips and tricks, your fellow Epoxy friends all join in on the Q&A, project pictures, recipes, and more. About us: Stone Coat Countertops is an epoxy based YouTube channel that will show you unique ways to DIY your way to an amazing kitchen, bath, resin art, construction, or design project on a budget. We believe in teaching skills in, woodworking, art, epoxy floors, epoxy countertops, and showing how to get realistic results to make your old laminate, tile countertop, formica, concrete countertop, garage floor, and walls look like renewed works of resin art! Simply put we are always looking for our next project to help all the DIY folks, contractors, designers, artists, and hobbyist, tackle their next makeover. Watch our free how to videos on the skills to make your dreams come to life with epoxy resin! Contact us anytime for free project support, (541) 450-1976 You Got This! Want to learn more about what we do? These are the subjects we cover from start to finish! epoxy, epoxy countertop, epoxy flooring, painting with acrylics, art resin, painting, painting countertops, dirty pour, epoxy metallic, epoxy metallic floor, epoxy table, epoxy resin, epoxy resin table, diy, woodworking. #StoneCoatCountertops #epoxy #YouGotThis

Applying the Second Coat of Epoxy

Ultimate Top Coat

Flooring Top Coat

all right time to clean this basement up
then we’re going to prime and then we’re
going to top coat
floors are easy but you want to make
sure that you get all that dust dirt
grime and mess up off this floor this is
a huge 4 000 square foot floor that
we’re gonna do it’s all continuous and
connecting and i’m gonna show you how to
do it with two guys in a matter of days
it’s simple it’s a lot of work but the
steps are easy all right this is gonna
be a cool little bunk room i can’t wait
to show you here we go
all right my buddy brandon and my
brother matt helped me clean this floor
which was the first step make sure you
sweep get all the dust and then vacuum
it up
show me vacuum step
next step is to mix the epoxy for my
primer
cutting in the perimeter first
we’re doing a seal coat the sun went
down a long time ago
[Music]
we’re gonna add metallic why do you add
metallic you want black underneath just
about any color it magnifies and
accentuates it and makes it look deep
and basically really good
that’s the exact amount you want right
there metallics is how i tint my foreign
epoxy because it looks like a floor
should it’s not spray paint it’s not dye
we’re not making it look all like stone
we’re doing a coating of metallic
infused epoxy let’s go
make sure you mix your metallics
thoroughly so you avoid any clumps
yeah so what i do
around the door trim
is use a brush
because you can cut it in where you
don’t get trim all messy
i use a two inch cut-in brush around my
woodwork and a small six-inch weenie
roller around the perimeter and a large
roller to do the field
remember i’m just doing a seal coat on
this step so i’m applying a thin coat
with black metallics added
and just go over each area multiple
times so you get an even coat remember
don’t put it on too thick
if the seal coat is applied thin enough
the air can escape and it won’t get
trapped therefore you won’t have a bunch
of bubbles to sand out the next day
having multiple people help me allowed
us to apply and mix all at the same time
so we were never waiting on more
material mixing is half the battle all
right let’s finish the seal coat and
we’ll wrap it up for the evening
all right when i came back the next day
i did have a few air bubbles that are
easy to sand out using basically a
drywall sander and a little bit heavier
grit i like to use about 120 grit
sandpaper and just pop any bubbles but
because we were within that 24 hour
period we were able to simply just mix
and apply the top coat as opposed to
sanding the entire floor i just needed
to knock down those bubbles that’s key
apply it before that 24-hour window ends
and you don’t need to sand the entire
floor because it’s still cross linking
and it will bond beautifully
when applying the second coat of epoxy
i’m going to pour my bucket out and
focus on the perimeter first i’ll use my
magic trout to push the material right
into the perimeter and then i’ll focus
on the field i’ll use the magic trial
just to go back and forth covering the
field working my way out of each room
plan your room so you don’t paint
yourself into a corner
[Music]
i’m using two different colors white and
black metallic i pour out a ribbon of
white and then a ribbon of black and
then trowel them out
[Music]
so there’s three ways to use this this
is your magic trowel
it’s angled
see that
so you can pull to you
you can scoop it back by flipping it and
scoop it back
and then you can pull it upside down
so when i’m trying to go into corners
i can push a big blob over there
turn it and then just pull it down that
wall
i start at the walls
and then i pull the field
it’s really one two three
upside down
right side up forward back you don’t
want to try to go forward with the right
side up it sticks if you’re going to go
forward turn it upside down and push
like a shovel now you’re trained you’re
a journeyman thank you all right set
that up
[Applause]
when i get into the large portions of
the great rooms you can see that i’m not
going in straight lines like a lawn
mower i’m actually going in organic
movements the reason i’m doing that is
so it doesn’t look like it was man-made
mother nature is organic it’s
free-flowing and that’s what i’m doing
we have
the inspector on site all right we’ve
got the
second coat on
looks really really good
i love this look now it’s time
for the ultimate top coat the ultimate
top coat is going to give us superior
scratch resistance it’s going to make
this floor look like a natural sheen
instead of a super high gloss and we’re
going to add that ultimate top coat so
that this floor is scratch resistant
for years and years to come man i love
the organic look and the flow that we
did by adding two colors black and white
and simply putting them out segregated a
row of black and a row of white and
melding them together by using that
magic trowel you get this look it
couldn’t have been easier it’s a lot of
labor but the technique was simple all
right let’s do the top coat right now
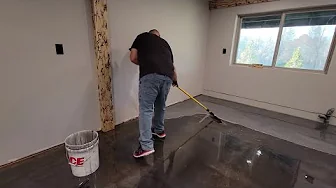
when applying my flooring top coat i’m
simply adding it thick and then i’ll
come back and back roll it to get the
material a little bit thin but still
have even full coverage over the entire
floor you don’t want to leave any undone
spots because then you’ll see some
shininess pushing through and you’ll see
some lap lines but if you do your
strokes overlapping themselves using a
one quarter inch nine inch roller in
this case i went ahead and used some
tape and got rid of any loose fibers off
that roller prior to applying my top
coat and look at the end result i went
ahead and recorded this live check it
out behind the scenes i’m on a wi-fi
signal right here on this job site this
was all just uh
glued down carpet
you gotta see this
look at this basement
look at the floor here i really love how
it came out all i did is use two
metallics i used
white and i used black
and this floor is just
beautiful look at that
look at that floor
just love the feeling down here it’s
really cool we’re gonna do a wood stove
here
we’re gonna do a theater
theater down here
the garage is not quite dry so i’m not
gonna walk on that yet
okay this is gonna be where we put some
gym equipment in here
remember the steps were simple first we
cleaned everything up vacuumed all of
the dust we mixed our materials and cut
in the perimeter we added our seal coat
added the flood coat with two different
colors white and black and then simply
did the ultimate top coat i hope you
enjoyed this video remember until next
time from stonecoat countertops you got
this i’ll see you
on the next video
you